The Archival Services department at the Center for Jewish History in New York provides processing services to the Center’s five partner organizations (American Jewish Historical Society, American Sephardi Federation, Leo Baeck Institute, Yeshiva University Museum and YIVO Institute for Jewish Research). The department is six full-time archivists, one part-time archivist, and a manager (that’s me).
Three archivists are currently processing the records of Hadassah, the Women’s Zionist Organization of America, which are on long-term deposit at the American Jewish Historical Society. The existing arrangement and description of the roughly 1,000 linear feet of materials varies widely (from item to record group level, and everything in between). The ultimate goal is folder-level control over the entire collection, using as much of the legacy description as possible. A high-level summary finding aid is available here: http://findingaids.cjh.org/?pID=2916671
As we process, we are trying to ensure that the terms in our narratives and assigned titles (names and places in particular) are consistent. This is tricky – there are many variant spellings and transliterations, and name changes abound as well. So we asked ourselves, how can we run a set of terms against a body of description?
I tried using an XSLT stylesheet, a Schematron, and xQuery via BaseX, but I kept running into problems with string processing. I’m sure there are many other ways to peel this grape, but eventually I tried using the Unix command-line program grep, and ultimately was successful. Most of this is stolen directly from a Stack Exchange post cleverly titled How to find multiple strings in files?.
We ended up with the following as our workflow, which we run across all the project finding aids periodically or as we add new terms to our list or create new finding aids.
- First and foremost, come up with a list of preferred terms and their alternates. Save this compilation somewhere (we are using an email chain at the moment to do the work, and then saving a text file on the shared project drive). A couple of caveats here – if our preferred narrative term differs from the LC term, we use the LC term in a controlled tag like persname or corpname, and we introduce our preferred term in the narrative together with the alternates. The goal is to have consistent terms in our finding aids so they are easily searchable.
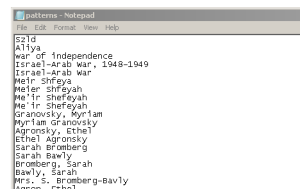
- Create a text file that contains the alternate terms we want to avoid, one per line. Save this as patterns.txt.
- Save into one folder all the files you want to check – in our case, we started with the three completed RG-level finding aids in EAD, rg1.xml, rg5.xml, and rg13.xml. You can run the terms against any text file though, such as an HTML finding aid or a text document.
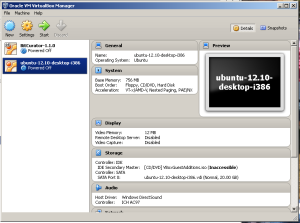
- Create a virtual Unix machine (I used the Oracle VirtualBox to create a Ubuntu 12.10 machine– this is the same way BitCurator is installed, so one could follow those instructions, substituting a regular Ubuntu disk image instead of the BitCurator image). NB THIS PART IS TRICKY. If you’ve never installed a virtual machine before, this could require some time and effort. Of course, if you are in a -nix environment, you can skip the VM entirely.
- Boot up the virtual machine by highlighting the correct machine and hitting “Start.”
- In the virtual machine, using the Devices menu, enable bi-directional copy-and-paste and bi-directional drag-and-drop in the virtual machine. This allows you (in theory!) to move files and copy text between your Windows desktop and the VM. I always have a hard time getting this to work; sometimes I email myself files from inside the virtual machine.
- Install aha (an ANSI to HTML convertor) via the command-line (Ctrl-Alt T to open the command line):
sudo apt-get install aha
- Create a folder on the virtual machine desktop, and drag your patterns.txt and the finding aids to be checked over from your desktop.
- Open the command line (Ctrl-Alt T), and navigate to the folder where your files are found.
- Type the following (this will change DOS/Windows line endings from CRLF to just LF; thanks to Google and the hundreds of people who have encountered and posted about this frustrating quirk!):
sed ‘s/\r$//’ < patterns.txt > patterns_u.txt
- You are now ready to run the key command, grep:
grep -n rg*.* -iHFf patterns_u.txt –color=ALWAYS | aha > output.html
So what’s going on here?
grep is powerful unix tool for pattern matching
-n is a flag that prints line numbers of the found terms in the output
rg*.* grabs all files we are checking, in this case everything starting with rg
-i flag: make the search case-insensitive
-H flag: print the filename in the output (useful if looking multiple files at once)
-F flag: read the text strings as strings, nor regular expressions
-f flag: look at a file for text strings, in this case patterns_u.txt
patterns_u.txt: our list of terms we are looking for
–color=ALWAYS: this flag makes the output pretty, with ANSI colors
| aha > output.html: this pipes the standard terminal output to pretty HTML
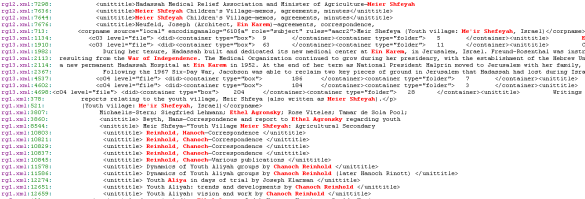
- Examine the results by opening output.html in a browser; matched terms are in red:
And, voila, we can go back and examine where these terms occur, and see if they should be changed to the preferred term. Since this requires human judgment, it’s not automated, but it should be possible to add some find-and-replace functionality using a variety of tools (maybe a shell script that loops through the terms list and uses sed or awk to replace them?). But I leave that for brighter minds than mine.
Thanks to my processing team, Andrey Filimonov, Nicole Greenhouse and Patricia Glowinski, for working this out with me; to Maureen and the gang for letting me post this; and to Nicole for encouraging me to write it up.


